
How Do You Use a Mirror Dash Cam?

Ben Wells is a tech enthusiast specializing in cameras and GPS devices. He has a keen interest in reviewing dashcams, navigators, and other useful car...
It is simple to understand how mirror dash cams work; they are dash cams, also known as rearview mirror dash cameras, that are mounted on the rearview mirror of your vehicle to provide an unobstructed view of the road behind when parking you and help record video footage from the front windscreen while you are driving.
To use a mirror dash cam, you’ll need to strap it to your car’s rearview mirror, adjust the camera angle, then route the wire to a cigarette lighter 12V plug or car USB port to power the dash cam, and then insert an SD card and it will start recording. You don’t need special skills for mirror dash cams, they have the same functionality as normal DVRs but have wider screens and are multi-purpose.
In this guide, you’ll learn, on how to install a mirror dash cam and how to operate it.
Two Types of Mirror Dash Cams
Mirror dash cameras come in two varieties, differ in installation technique but with identical capabilities:
- Clip Over Rear View Mirror
- Replace Car’s Rear View Mirror
- Clip Over Rear View Mirror: This type can fit over the rearview mirror. which means easily be attached to your existing mirror for added convenience using straps or clips and requires no part replacement.
- Replaces Car’s Rear View Mirror: This type is a replacement for your car’s rearview mirror, and it create a more integrated and seamless look. It can benefit old vehicles by improving visibility and parking aid as a digital rear-view mirror.
How Do You Use a Mirror Dash Cam?
It’s important to familiarize yourself with the capabilities of a mirror dash cam before installing it in your vehicle to ensure you are fully satisfied with the benefits it provides.
Before continuing, consider your mirror dash cam: if it comes with a stock mounting bracket, you will need to remove your rearview mirror. The majority of mirror dash cams are designed to clip onto the mirror and do not require any parts to be removed.
Mirror Dash Cam Installation Steps
- We begin by gathering all necessary tools and materials., and start with the unboxing.
- It should include a mirror dash cam, car charger (12V), rubber mounting straps, GPS antenna (optional), cleaning cloth, TF card (optional), backup camera, cable for the backup camera (10 foot), rear camera bracket, and a user manual.
- Mount your dash cam over the car interior rearview mirror using straps, and make sure they are tightened securely to ensure the dash cam stays in place.
- Route the charger cable to a 12V cigarette lighter plug or USB port to power the dash cam.
- Insert the SD card into the dash cam, following the manufacturer’s instructions, it shouldn’t be greater than the maximum support capacity.
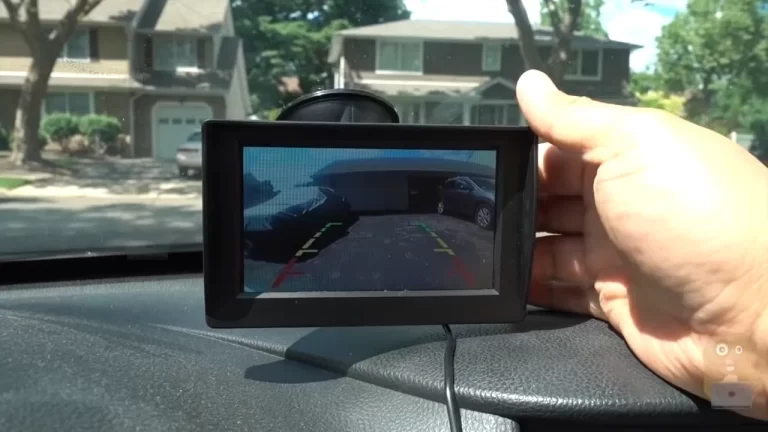
- Turn on the dash cam and make sure it is functioning properly. You need to adjust the settings or calibrate the camera to ensure that it is recording properly.
- At this point, you can test the dash cam by taking a short drive and verifying that it is recording correctly. Make adjustments to the front camera angle for a wider view.
Rear View Mirror Backup Camera Installation
For added convenience and peace of mind, a rearview mirror dash cam with a backup camera is a great choice to maintain the dash cam function and parking.
Ideal Position: You should determine the best location for the backup camera.
- You can choose the backup camera to install either inside the rear window or outside of the car.
- It can be mounted inside the cabin close to the rear window, on the rear of the vehicle, or near the centre of the license plate or bumper.
Even though the inside cabin is an option, most people prefer a backup cam outside for a clearer and wider vision, and they should because they have an IP67 certification, so outside is not harmful.
Additional Configuration Steps for Your Mirror Dash Cam
- We need to position the backup camera outside near the license plate at the centre for proper rear view.
- The position is for SUVs, Sedans, and Pickups, but Vans Motorhomes and lorries should have top mounting instead of lower at the license plate.
- Now mark the position at the license place and use screws to make sure to tighten securely.
- Connect the wiring harness to the camera and route it to the front of the vehicle, making sure to keep it hidden and protected as much as possible.
- Now the trickiest part is you need to connect the power and reverse trigger wire (tail light or reverse gear) to automatically activate the backup camera for reverse view.
- The backup camera also requires 12-volt power, which you can get from your tail light assembly’s reverse lamp.
- To identify whether the wire is positive, use a test light or a multimeter. In this example, connect the camera’s red wire to the positive wire and the black wire to the ground.
- This will guarantee that the backup camera activates when the car is turned on, and the parking brake is applied or while changing into reverse.
- Then, you need to align and calibrate the reverse camera guidelines to ensure that it is displaying correctly for parking aid.
You will now benefit from the increased convenience and security that a backup camera provides.
Remember that continuous recording requires a hardwiring kit that is not included with the mirror dash cam and is normally provided by a third-party seller, which you can use to maintain the camera to guarantee that it continues to operate correctly even when the car ignition is turned off.
Read: Do Dashcams Records When Car Off?
Conclusion
You will find mirror dash cams are similar to other types, useful for reverse parking with a clear view of the road behind you and can be used to capture accidents, incidents, or other events that occur while you are driving. By following the steps mentioned, you’ll learn how to use a mirror dash cam, from installation to testing, and use its features.
- Latest Posts by Ben Wells
-
Best High Temperature Dash Cam
- -
Best Mirror Dash Cam UK
- -
Best Dual Dash Cam under £100
- All Posts